Showing posts with label Before and After. Show all posts

Thursday, October 21, 2010

Flashback Friday....Chalkboard makeover


This project has evolved over two years. Chalkboards have been the rage in homes for several years now. In 2009, I wanted to jump on the bandwagon and make a chalkboard for my home. I had made one plate chalkboard in the kitchen, but I wanted something bigger. Finally, I rediscovered this picture that was under our bed. The glass was broken, the picture was scratched really bad, so I decided it needed a new life.


Before:


I bought some chalkboard paint and this is how it looked for a year! Now you know why you don't see more projects. I have too many started and not finished. Geez!

During:

First day of summer break 2009

Here is how it looks today! I love it. I painted the mat a pretty green with some free paint from Glidden, but was not satisfied. I then added some ribbon on top and love it. I also spray painted the frame black. Here is the new and improved chalkboard...

After:


How many chalkboards are in your home?

Monday, June 7, 2010

He Did It!

August 18, 2009

June 3, 2010


Congratulations Caden! We are proud of you!

Wednesday, March 3, 2010

Modge Podge Mania...I Finally Made it to the Party!

I am excited to have finally jumped on the Modge Podge bandwagon. Before blogging I did not even know what it was. Xazmin @ This is the Year hosts a fun Modge Podge party once a month. This is my first time joining the party, and now I am hooked.

Now, I realize I'm a little late for the party. Oh, and Valentine's day has come and gone, as well as the candy I'm sure. However, I am here! For my project I found a couple of cute tins at the Dollar Store a while back. Then I pulled out some Valentine scrapbook paper I already had on hand. Well, I modge podged the tins into something special...a Valentine treat for the boy's teachers. They loved it. Cameron's teacher really loved it. She loved the vintage paper and was surprised to find out I did that.

It's not the best pictures. I am still learning to take pictures without the flash and my house is dark.


Before: Pretty cute, but not the look I was going for.

This was the easy part.


After: Now, I'm liking it.

Mmmm, even better!

Ready to be delivered.

I'm linking up with Xazmin's at This is the year. Check out the other great projects!


Monday, December 28, 2009

A Christmas Surprise

Remember my exciting find this past summer? I picked up this great gumball machine for $1.00. It even had money in the bottom of it! Well, I knew when I found it just what I would do with it. I saw the idea about a year ago on a DIY blog and then here, and loved it.

Here is the before:


After: meet Dino!


The fish tank...it is so stinkin' cute!


Dino's pretty cute too!


The boys were so excited about the fish. Caden hugged me and told me again today, "thanks for the fish." I'm excited it has such a cute, unique home!

Sunday, December 6, 2009

The Beginning of a Great Makeover!

I've been wanting to make over Cameron's room for a while now. I found a perfect piece to go in his room, which spurred the make-over on. Cameron loves sports, so this is the theme for his room.

What is the perfect piece? I found a set of lockers on Craigslist for $20.00. I was so excited, and knew they would be perfect. The lockers were a basic tan. I wanted it to be red, so spray paint to the rescue! I love spray paint! What an easy way to transform something. Of course, the possibilities are endless. I used Rust-oleum spray paint to transform the lockers.


Rust-oleum Gloss Protective Enamel


Before:


After:


I love it! I love the storage too! Well, that is a sneak peek into his room makeover. The denim curtains and locker are new. Many more changes to come! What have you transformed with spray paint?

Check out some other great transformations and Shanty 2 Chic!


Wednesday, February 11, 2009

2008 Completed Projects

Here are some of our projects we completed for 2008. There are many more for this year that we hope to get accomplished.


My first staining project: Headboard (Master bedroom)
I found this headboard at a yard sale for $10.00! The front of it is Southwestern Style...not me! I just flipped it around. I couldn't decide if I wanted to paint it black to go with the rest of the black in my house or stain it dark. Hmmmm

Before...


After....

What do you think? Not bad for my first stain project.


Project 2: Stain Night Stand (Master Bedroom)
Well, if I stained my headboard I might as well, no have to, stain my night stand.

Before... No picture. It was an oak color.


After...


Project 3: CD Shelf (office)
I bought an inexpensive CD cabinet from ABC Distributing for the office. I wanted something cute to hold all the computer games, picture CD's, etc. Something that I could close up. This cabinet had two doors with four photo holders on each door. Perfect! Well, we didn't have this shelf for one month before one of the doors just broke and fell off. Could not save it.


As for the uncovered little cabinet I'm not sure what to do. I don't like it open. I've thought about fabric. Any suggestions? Notice the skunk on the top...there is a crazy story about that for another time!!


I ended up taking off the good door and turning it into a horizontal photo frame that I have above my desk...trying to be frugal and creative at the same time.


Yes, this old house has lots of paneling, thank goodness not in every room! We will be working on changing that in the near future.


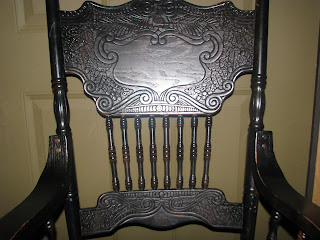
Project 4: Chairs (Dining Room)
I kept seeing in decorating magazines a brown table with black chairs around it. I liked it. We have a black in our living room. I wanted to bring some black to the other end of the house to tie the two rooms together a little more. I think it looks great. Who doesn't love what a can of spray paint can do!

Before...Still digging for that picture. Will post soon.


After...
I used a satin finish...this first picture looks a little dull. I guess because of the window behind me? So, I took another shot.


Project 5: China Cabinet (Dining Room)
I wanted to do something to make my china cabinet stand out more. So, on a whim close to Christmas and family coming to my house I decide I would spray paint the inside of the cabinet black. Well, this turned into a disaster and causing me to be sick for a week! You can read more about that here. My DH kindly finished the project with indoor latex paint.

Before... No before picture. ;o( However notice the paneling in the second picture...it was that color.

After...